The maven site plugin is quite a nice tool. I really appreciate writing my project documentation once in one format and then have maven produce both a web site and a PDF document. This is very powerful. I have however come to dislike the APT format. OK, I understand the reason for it. It is plain, simple and can be edited in any editor, usually the default text editor of your IDE. It however has some drawbacks:
I started thinking, wouldn't it be nice if I could write my documentation in OpenOffice and still be able to use all the merits of maven site generation. I ended up with maven-odt2apt-plugin.
An .odt document is actually a whole set of XML files within a ZIP file. The important XML file for this is the content.xml containing all the text of the document with style references using the style names.
The plugin looks for any .odt files under a specified source directory, converts them to APT, writing them to the specified destination directory. Any images found in the document are copied to the specified image directory. You must also specify a relative path to the images for the APT document.
Tables are currently not supported!
This plugin was written against version 1.2 of the ODF/ODT format. It has been tested with OpenOffice version 3.1.1.
This is an "Open Text Template" file. You need to download it either from the same site as this documentation or download the zip distribution that will also contain this document.
The APT.ott document has a number of custom styles all beginning with "APT-". Easiest is if you in the OpenOffice "Styles and Formatting" window select "Custom Styles" in the drop down menu at the bottom. Then you will only see the APT styles.
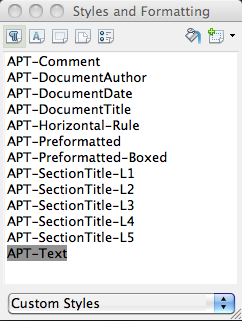
There is an APT style for each style supported by the APT format. You must use these styles and only these styles! You can however modify the formatting of any of the styles if you don't like my formatting. The important thing here is the style names. They cannot change! You can also make changes to formatting in the document after applying one of these styles to the text. For example font size or changing language for spell checking, etc. The changes must however be based on the original style. You cannot first apply an APT style then apply another non APT style since that will remove the APT style. When you have made small changes to the formatting of some text after applying an APT style on it OpenOffice will generate a privately named style that extends the base (APT) style. In the content.xml document these style extensions are listed before the actual document text so the plugin uses this to resolve the base style when any of the generated styles are used on text.
You actually aren't absolutely required to use my ATP.ott template. You can make your own template as long as you use the below listed style names.
Here is the available styles:
APT-Comment
This style is for comments and will not be included in the final output from the maven site plugin. They will be converted to comments in the APT document.
APT-DocumentTitle
This is a special style that should only be used once. The paragraph having this style should only contain the document title.
In APT the document title, document author, and document date must come first before anything else, and in that order. I prefer to do the same in the OpenOffice document. You can however put it anywhere you want in the document. If you use this style on more than one paragraph in the document it is the last one that will be used.
APT-DocumentAuthor
This is a special style that should only be used once. The paragraph having this style should only contain the name of the document author.
APT-DocumentDate
This is a special style that should only be used once. The paragraph having this style should only contain the document date in YYYY/MM/DD format.
APT-Horizontal-Rule
This produces a horizontal rule across the page.
APT-Preformatted
This is for pre-formatted text. Spell checking is off for this style.
APT-Preformatted-Boxed
This is same as APT-Preformatted, but with a thin box around the paragraph, and slightly indented on both left and right side.
APT-SectionTitle-L1
Top level section title.
APT-SectionTitle-L2
Sub section title.
APT-SectionTitle-L3
Sub sub section title.
APT-SectionTitle-L4
Sub sub sub section title.
APT-SectionTitle-L5
Sub sub sub sub section title.
APT-Anchor
This produces an anchor in the document. The whole text block with this style becomes the anchor name. You can use a link to link to this anchor. See further down under "Other non style based".
APT-NonBreakingSpace
The text having this style will have non breaking space. This is indicated by a thin dotted line under the text in the OpenOffice document just to visualize that it has this formatting.
APT-Text-Bold
The text having this style will be bold.
APT-Text-Italic
The text having this style will be italic.
APT-Text-Monospaced
The text having this style will be monospaced. It will also turn off spell checking.
APT-Text-Plain
This is what you have if you don't use any of the above. You can use this to restore to normal text again.
APT-List
This is a plain list with a small dot for each list item.
APT-List-Numbered
This is a list with a number for each list item (1, 2, 3, ...).
APT-List-Lettered-LowerCase
This is a list that is numbered using lowercase letters (a, b, c, ...).
APT-List-Lettered-UpperCase
This is a list that is numbered using uppercase letters (A, B, C, ..).
APT-List-Roman-LowerCase
This is a list that is numbered using roman numbers in lowercase (i, ii, iii, ...).
APT-List-Roman-UpperCase
This is a list that is numbered using roman number in uppercase (I, II, III, ...).
If you select some text, then go to the "Format->Character..." menu and select the "hyperlink" tab you can enter an url there.
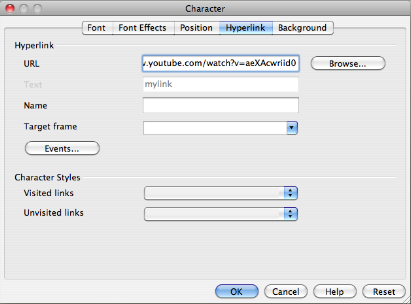
This is recognized and translated to the APT document. You make a link to an anchor this way also.
Images inserted into the document are also recognized. When you add an image to OpenOffice it will rename that image to a generated name and store it under "Pictures" in the zip. The content.xml file will have a zip root relative path reference to the image. This is the reason we need to specify an image destination and the APT document relative path to that image destination in the plugin configuration. The image will be copied to the image destination and the APT relative path will be used to reference the image in the APT document. The image will retain the OpenOffice generated name, there is nothing I can do about that since the original name is lost.
In OpenOffice you can place the image wherever you want on the page. APT is not as flexible. The image will always be placed to the left as its own paragraph. It will also have its original size no matter if you shrunk it in OpenOffice. Again APT does not support specifying a size on the image.
If you haven't downloaded the zip distribution you need to add a reference to the following maven repository in your pom:
  <project>
    ...
    <repositories>
        ...
        <repository>
            <id>maven-biltmore-se</id>
            <name>Biltmore maven repository</name>
            <url>http://maven.biltmore.se/mavrep1</url>
        </repository>
    </repositories>
    ...
  </project>
If you add this repository it will download automatically.
Here is an example of maven setup:
        <plugin>
          <groupId>se.biltmore.tools.odt2apt</groupId>
          <artifactId>maven-odt2apt-plugin</artifactId>
          <version>1.0.1</version>

          <configuration>
            <source>${basedir}/src/site/odt/**/.*\.odt</source>
            <destination>${basedir}/src/site/apt</destination>
            <imageDestination>${basedir}/src/site/resources/images</imageDestination>
            <imageAPTLinkPath>images</imageAPTLinkPath>
          </configuration>

          <executions>
            <execution>
              <id>convert-odt-to-apt</id>
              <goals>
                <goal>odt-to-apt</goal>
              </goals>
            </execution>
          </executions>
        </plugin>
Just copy this plugin definition to the plugins section of the pom and modify the configuration if needed. This plugin is by default bound to the "pre-site" phase, so when you do:
mvn site
The plugin will execute before site generation and convert your odt:s to apt:s which will then be converted to html by the site plugin.
Please don't do my mistake of stubbornly insisting on doing "mvn site:site" and scratching my head, and doing a bit of swearing trying to figure out why the plugin is never run. "mvn site:site" will invoke the site plugin and nothing else while "mvn site" will invoke the site lifecycle starting with the "pre-site" phase going up to the "site" phase. There is a big difference between the two even if they look very similar!
It looks like the maven-site-plugin is always executed in the site phase, that you don't need to specify in the plugin section. It could also be the maven-project-info-reports-plugin in the "reporting" section that triggers the site plugin.
This is where to look for odt documents to convert.
The next to last part of this path specification can be "**" which means next next to last part directory and all directories below. If this is skipped the next to last part will be a directory and only this directory will be looked at.
The last part is a regular expression for matching file names. Please note that a "normal" file wildcard would look like this: "*.odt". In a regular expression however '*' does not mean "any", but "one to many". '.' means any. So for regular expressions the previous example would be: ".*\.odt". If you are wondering about the '\' it is to escape the '.' before "odt" so that it will be treated as a period and not "any character".
Windows : On windows any '\' character used as escape in a regular expression will unfortunately be treated as a file separator. To go around this problem for windows the '!' character can be used as an escape character instead. It will be translated to '\' before the regular expression match.
Default is "${basedir}/src/site/odt/**/.*!.odt".
This is the directory where you want the resulting apt file to be written. The file name will always be that of the odt document source file, but with an .apt extension instead.
Default is "${basedir}/src/site/apt".
This is the directory where images found in the .odt document should be copied.
Default is "${basedir}/src/site/resources/images".
This is a relative path from the generated site root where the APT document can reference the images copied to "imageDestination".
Default is "images".
If true simple verbose output listing converted files are displayed. If false it is completely quiet unless warnings or errors.
Default is "true".
If true a lot of debug information will be displayed during conversion.
Default is "false".
If true all failures will be displayed, but execution will continue without breaking the build. If false all failures will cause an exception and fail the build.
Default is "false".
Not anymore to say about this plugin. I hope you enjoy it! Please report any bugs!
Tommy Svensson
opensource@biltmore.se

